| The process for sowing is always more or less the same, excepting certain steps concerning the tiny seeds (about that please refer to the section devoted to this type of sowing here ) or for very large seeds and some rare exceptions. Here are these various general steps, from preparing the seeds to the first transplant after the germination occurs.

Viability of seeds and steeping
Unsustainable seeds are often the cause of failure during sowing.
Seeds can be dead because they are not fertilized during the natural process or when they are too old or when they have been poorly preserved before sowing.
It is also important to know that the life of a seed is very variable, depending on the species and the conservation technique. Some seeds have a very short lifespan (eg cocoa - a few days) others several years (eg Baobab - about 10 years). It is not the size of the seed that determines its life.
The viability of a lot of seeds can be tested by soaking, which is also often recommended before sowing, except for seeds that are too thin and difficult to sow once wet (see the section on this type of sowing ).
It is important to try to control the viability of seeds, but this is not always possible, for example for seeds that are too light or small and there are also some species whose even fresh seeds float naturally (they are often transported by streams in their natural environment).
Place the seeds in a jar filled with warm water, about 30C, and let them soak until they sink to the bottom of the jar. They can sink immediately but it can also take several hours.
For medium to large seeds, after a wait of up to a few hours, the viable ones sink and the dead float. But beware! it is also possible that some seeds still alive float and it is good to separate those floating from those that flow and sow separately.
The seeds can be left to soak for 12-24 hours, but the smaller the seeds, the less so they have to be soaked for a long time.
An important advantage of soaking and avoids the problem of incomplete wetting of the seed possible during sowing without prior soaking and which may result in a lower germination percentage.
After soaking, the seeds are collected (through a sieve if they are small) and then begins the sowing itself.
The container
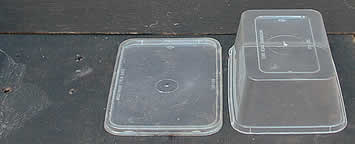
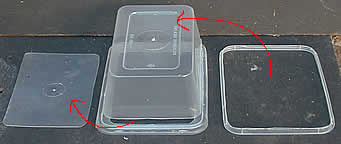
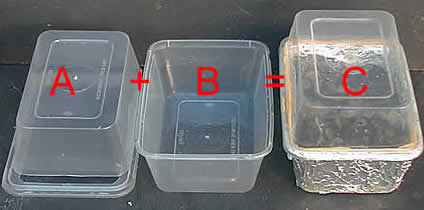
| Self made "container"
|
| |
|
-
the two parts of "A" are stuck with standard adhesive Pattex.
- the part "B" is covered outside with aluminum foil.
- not to forget to practise holes of drainage on the "B" part
|
The choice of seedling container depends on several factors, such as the amount to be sown (several thousand seeds or a few), the size of the seeds, the time between seedling emergence and transplanting, and so on. We must therefore think about what we decide to do after the seeds are lifted, let them grow longer or shorter, or transplant them to another environment. One can very well have the choice according to the way of working or the means of cultivation.
- A generally accepted rule is that the larger the seeds are, the larger the volume must be: we do not in principle germinate a coconut in a thimble!
- It is generally preferable not to disturb very young plants too much, so provide a minimum of volume so that the plant can develop a sufficient root system until the next transplant.
- Provide on average a minimum depth equal to 10 times the thickness of the seed.
- It is not mandatory to use sophisticated equipment for seedlings, depending on the type of seed can be done very well with a pot of yogurt, a can of sardines, a fast meal tray, the bottom of a bottle plastic whose cut top can be used to create a mini greenhouse, etc. Each has to choose according to the number of seeds to sow by species, their size, the depth necessary for the development of roots, etc.
- In almost all cases, it is very important to pay attention that the container is drilled in the bottom so as to allow the excess water to escape. In the lower lateral part it is also good to drill a few holes in case the bottom holes get stuck or if the bottom "sticks" too much to the surface on which the seed is placed.
- Sowing pans sold commercially are especially useful when sowing many seeds of the same species or similar species, but avoid sowing in the same terrine species that do not have the same pace of growth or not the same development or different water needs.
The
medium
One finds in the trade what is called "Compost for sowing"
but it is not obligatory to acquire that to carry out its own sowings.
- the medium must be draining so that oxygen penetrates and seeds
did not rot easily.
- the mixture [ ground of garden + coarse sand ] in equal volumes
is completely suitable for the majority of sowings
Filling
of the Container
The container must be filled but not too much so as to preserve
some place for:
- the thickness of seeds
- the thickness of the layer which is covering the top of seeds.
- the height necessary to the development of the plant after germination.
- If a lid is put, the height necessary to the development of the
first leaves until the withdrawal of the possible lid.
- To set out medium homogeneously.
- To pack slightly and level with a flat object such as melt of
glass, limps of matches, knife blade etc this to be able to place
seeds in a regular way.
Placing
the seeds
The seeds will be distributed in a homogeneous way, if possible
remotely equalizes one of the other.
- Distance advised between two seeds: from 3 to 6 times size of
seed at least.
- For too small seeds or "in dust", to see the section
devoted to this type of sowing.
- the position or the orientation of seed in space generally does
not have a major effect on germination, nature making the things
well. However if you note that the seed with tendency to take a
position rather than another, why not?...
Overlaying
the seeds
In the majority of the cases it is necessary to cover seeds.
- Thickness advised for covering: 1 to 1,5 times size of seed
- Pack slightly, the goal being to avoid the "bubbles"
around seeds.
- For too small seeds or "in dust" (cactus, Kalenchoes,
etc), to see the section devoted to this type of sowing.
Medium
humidification
This point is very important because a badly made humidification
can compromise a sowing. Water should not be too cold nor too heat
(30°C is a good temperature).
The humidification of the substrate can be made either before the
placement of seeds or once the covered seeds:
1 Before the placement of seeds:
This way is operated if the seeds are too light or too small and
that there is risk of displacement of those Ci at the time of watering
or humidification. In this case the substrate can be sprinkled before
compressing and the surfacing or humidified by steeping in a bath.
Thereafter after placement of seeds and covering it is wise to supplement
humidification by brumisation of the added layer of substrate.
2 After the placement and the covering of seeds:
It is the general case when the seeds are sufficiently heavy to
remain in place during this operation. In this case two manners
of operating at least are possible: watering by the top or the steeping
of the container in a water bath.
- watering over is faster but more delicate to operate and more
random because the distribution of water is not systematically homogeneous.
But it allows in certain cases, for example when one does not wish
that the totality of the volume of substrate is humidified, to control
the rate of humidification of the substrate by proportioning water.
- watering by steeping is easiest to operate: it is enough to place
the container in a water bath a maximum height equal to the depth
of the substrate (it to avoid drowning sowing). For observation
of the increase of water to the surface of the substrate (it changes
"color"), it is necessary to let at least drain the whole
during a few minutes, one or two hours if possible. One can for
that slightly lean with dimensions container to cause an acceleration
of the drainage in excess. It is important to let well drain not
to have a saturation of moisture in the substrate.
A council which can appear useful sometimes: I often add a little
soap of crockery in water rather than to operate with chemical treatments
or other treatments sterilizing the substrate, than I do not advise
besides.
Packing
of sowing
Once the humidified substrate and the sown seeds, it is often advised
to cover the whole with a bag or a hermetic lid as long as the seeds
did not germinate.
This for several reasons among which:
- That makes it possible to avoid forgetting to sprinkle sowings
and reduces the workload considerably.
- watering being relatively delicate as long as the plants are not
established, one avoids the risks.
- the mini greenhouse thus created is most of the time favorable
to germination by maintaining a humidity and a temperature homogeneous.
- the draughts are avoided which are likely to cool surface suddenly
and to compromise the success of sowing thus.
It is preferable to choose a transparent cover to be able to control
germination without opening.
One can also place all sowing in a closed plastic bag, but pay attention
to have drained well front.
Waterings
after sowing
Some prefer not to cover sowings for various reasons (oxygenation
of the substrate, rinsing necessary of seeds like effect of rain,
etc.): they do not have completely twists in my opinion, but the
risks of lapse of memory to sprinkle, excess or insufficiency of
watering, draining of the substrate between two waterings and other
risks are not then to neglect...
Temperature
of medium until germination
This point is certainly one of most important and yet generally
neglected and majority of the echecs cause it!
The average temperature will determine at the same time the rate
of germination and the speed of lifting of sowings.
It is important to understand well that the tropical plants do not
germinate exactly under the same conditions of temperatures as the
plants of moderate countries.
That to hear like "average temperature"?: it acts of the
average between the maximum temperature during the day and the minimal
temperature during the night. This variable average temperature
according to the species, some being able well to germinate with
24°C of average, others not germinating with less 28°C of
average, but for a maximum success of the very great majority of
the tropical species, the ideal is of approximately 28°C.
The variation in temperature between the day and the night can be,
like often in tropical country, of approximately 10°C.
EXAMPLE: Minimal temperature the night 23°C + maximum Temperature
the 33°C day = average temperature 28°C
It is not a question either to make cook seeds, and an excessive
average temperature (40°C or more) can compromise the lifting
of the majority of the species.
It is thus important for a better success to control the ambient
temperature near sowing.
For that one can place at with dimensions:
- a Thermometer of environment giving the minimum and the maximum
reached
- a Thermostat which will light your possible electric auxiliary
heating when the selected temperature is not reached: one finds
the very suitable ones with less than 10 Euros in the garden-centers
or hardware, (see pictures below)
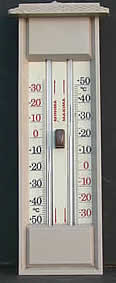
Thermometer giving the maximum and the daily minimum
|
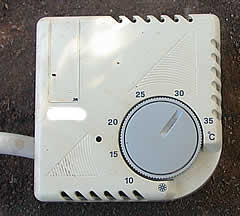
Thermostat connected upstream of the heating electric and
allowing to control the temperature
|
Storage
of container until germination
Where to place sowing?
- Contrary to certain ideas, sowings do not need light, and succeed
better in not very enlightened places.
- In winter, one can place sowing near a heating or close to a radiator,
not directly above if not place a wood board between the container
and the radiator. One can also get a mini heating greenhouse in
garden-center, it is a very practical tool. If not there also exists
of heating resistances type of terrarium or aquarium to be placed
for example in a pot filled with ground under the container at sowing.
- In summer, if the average temperature corresponds to what was
indicated higher, one can make sowings in outside, but it should
absolutely be prevented that the sun directly reaches sowings, the
risks being then large burns or of excessive temperature.
- It is wise to also know that an interesting site is the top of
a refrigerator, rather towards the back with the top of the radiator
since that Ci releases a little heat.
Time
for germination
Should absolutely be become aware that the times of germination
depend mainly, once acquired humidification, average temperature
which must be high. Patience is one of the rules of the success
and one can too often compromise a sowing by handling it for example,
by changing it place or while opening to observe if the seeds germinate.
For this reason, a transparent cover is useful, but it is preferable
to place sowings in a dark place until germination.
Under ideal conditions of temperature and moisture, the time of
germination is of a few days to three weeks, but certain species
take much more time (ex: Traveller-tree, Palm tree bottle).
During
sprouting and first growth
It is dangerous to intervene as of the appearance of the first plants,
because the opening of sowing or its displacement can compromise
the lifting of other seeds in the course of germination. It is thus
advised to still wait a few days until the great majority of seeds
raised before disturbing in anything sowing.
With rare exceptions close, as for example if one notes beginning
of rotting (cast iron of sowing) and that it is necessary then to
intervene to save what can still be it, it is not advised to intervene
as long as the plants did not develop at least two true sheets yet
(those which follow the cotyledons, CAD the first or the first two
"sheets" which are not actually).
It is thus preferable to wait until the plants are sufficiently
robust with handling before proceeding to the first road repair.
For this reason it is necessary to think of well distributing seeds
at the time of sowing so as to delay the moment of road repair as
well as possible.
Certain sowings can thus remain in place during many months, even
of the years (for example cactus or pachypodiums).
The interest of road repair is real only if the plants grow quickly
or obstruct the ones the others, or if the rate of germination of
the species being random, one sowed many seeds on little place (and
that sowing is successful than envisaged more...)
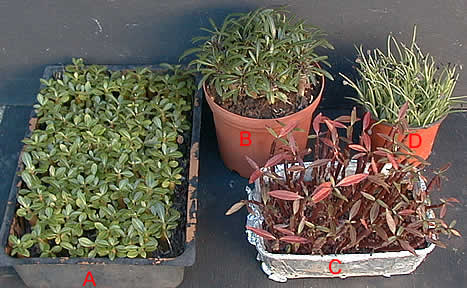
Below examples of sowings "good to transplant", in varied
containers.
|
A:
Adeniums // B: Pachypodiums lamerei // C: Pachypodiums baronii
// D: Agaves |
Preparing
the transplant
When the moment had just mended the seedlings, it is important to
envisage well the requirement in volume necessary for each seedling,
not to transplant in neither a too small nor too large container
(pot or sachet), in the first case it will quickly be necessary
to start again, in the second one occupies of the place unnecessarily.
It is also good before transplanting to acclimate the plants to
their new environment in gradually (over a few days - weeks) placing
them towards more light until if possible leaving them a few days
under the conditions illumination-temperature in which they will
be after transplant.
Road repair is one rather delicate moment because the seedlings
undergo a more or less important stress and it is necessary to avoid
of the martyriser unnecessarily. The radicular system (radicular)
must the least possible be disturbed and touched.
For leaving them their substrate, it is necessary well to have prepared
the pots in which one will place them.
An interesting technique of transplant consists with:
- Estimate the number of seedlings to transplant and prepare and
fill the consequently pots with the substrate being appropriate
for the selected species. In general a mixture with share equal
in volume of ground of garden and a compost of neutral repotting
"for house plants" sold in the trade is appropriate rather
well. Caution! compost question the least expensive is not worth
often large thing however and it is preferable to choose quality.
One can also see for that the substrate of culture advised on the
individual record sheet of the species on the Web site and to prepare
it is even.
- Sprinkle a little the substrate of each pot and to practise a
rather deep cavity by means of a pen, of a piece of wood, etc, in
which the radicular part of the small seedling will be placed. It
is preferable not to sprinkle the pot too much so as to keep a little
dry substrate around the hole to fill it later on when one transplants.
- Have at its disposal a ustensil of adequate watering, CAD which
makes it possible to control the flow and the pressure of water.
For that not need to invest in expensive tools, an ordinary plastic
bottle whose screwed plug was pierced with one or more small holes
is appropriate perfectly: it allows by pressure of the hand which
holds it head in bottom to control at the same time the direction
of the water jet and the versed quantity.
- once the pots of transplant and the ustensil of watering loans,
one can then proceed to the transplant to be strictly accurate.
The
transplant
It is advisable to make this operation with delicacy so as to as
well as possible avoid breaking the roots, "to grip" the
stem by holding it, in short of martyriser the plant at the time
of its handling.
1 First of all separate the seedlings ones from the others, for
that:
- If the substrate is dry and demolishes itself easily, one can
make this dry operation, by raising the substrate by lower part
at least of a flat object standard butter knife. Delicately separate
then the plants ones from the others by holding them, following
their size, between two fingers or by means of tweezers if the plants
are small, or in simply raising them on the blade if they are too
small and to store them for a few moments in position lying.
- If the substrate is compact and that the plants are likely to
break at the time of handling, it is preferable to completely wet
the substrate and to separate with the jet from water, delicately
always, the plants by removing the ground to some extent.
Store for a few moments in position lying the seedlings before to
have separated them.
2 Transplant one by seedlings in the individual holes applied to
the surface of the pots which are intended to them:
For that hold the seedling between the fingers of a hand in the
driving position with the top of the hole so that the radicular
part is under surface and make fall ground with the jet from water
practised with the bottle "water cart" or any other ustensil
of watering adapted in the hole to fill it. Hold one moment the
seedling after the stop of the payment, time that water goes down
in the ground and that that Ci holds the plant.
3 times completed work, place the pots in a very luminous place,
if possible the place where the seedlings will spend the next months.
To avoid during a few days the full sun if the place chosen there
is, envisage a piece of paperboard or any other screen so as to
make shade and to gradually withdraw this screen in the following
days.
After
the transplant
In the days following the transplant, it is wise to give a small
blow of inch to the plants for their "convalescence" by
brumisant each day a little, which helps them not not to dry too
much, while waiting for that their radicular system takes again
strength and can pump water in the ground.
Not to brumizate too often, simply to avoid the draining of the
substrate until noting the resumption of the growth.
Not
to do, between others...
- One should not absolutely put fertilizer in the water of watering
of the transplant, the risks of burn being then important.
- the water of watering should not be too cold, nor too heat. Ambient
temperature of the substrate.
- Prevent packing the ground with the fingers if the plants are
small.
Sowing
very small or tiny seeds
One will place in this category seeds difficult or impossible to
hold individually between two fingers, like seeds of cactus, of
Kalenchoes, certain Crassulaceae for example.
Stages
One will not make soak seeds before sowing.
Once the filling of the container carried out, one will add a coarse
pea grit or ballasting to it on which one will distribute in the
most homogeneous possible way seeds.
Distribute seeds on the substrate a ustensil like a small spoon,
a piece of paper in the shape of open horn or one limps of matches
half-opened will make the deal.
Set out again then with stolen on surface seeds while tapping slightly
on the ustensil containing seeds.
The seeds must for the majority "fall" into the interstices
from the gravel or the large sand.
Slightly pack surface by means of a flat and dry object to which
the seeds should not adhere, if not not to pack.
For humidification by capillarity of the substrate once sown seeds,
prefer the steeping of the container in a basin by taking care that
water level does not go up beyond the level of the substrate.
To let soak a few minutes at least so that the seeds absorb moisture.
Leave the container the basin of steeping and let it well drain
before covering it and placing it in a hot place and at the shelter
of the sun.
For the continuation, please take a look to the normal stages already
approached for the other types of seeds.
|